Scarves aren't only for your neck, you know! They make a fabulous cover-up.
First up, the tied-up halter-top:
1.) Fold the scarf diagonally.
2.) Twist the ends and wrap around your neck, knotting in place
3.) Knot the 2 remaining sides behind your back.
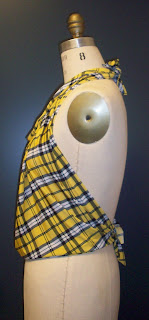
Here's a view of this technique from the side:
Next up, the squared-off, draped halter-top:
1.) Take the top 2 corners of the scarf and knot behind your neck.
2.) Take the bottom 2 corners and knot around your waist.
Here is a view of this version from the side. It's very similar to the first technique, but a lot more drape-y.
Third, we have the asymmetrical top. This is perhaps the most challenging and may take some practice to perfect your technique.
1.) Fold a corner over about 1/3 of the way
2.) With the fold facing up, knot the scarf together at your shoulder, then slide the knot back behind your shoulder
3.) Pull the bottom edges of the scarf to the back and tie those together.
Here's how the back will look:
Now that you've mastered the hardest one, here's perhaps the easiest:
1.) Fold the scarf diagonally in half.
2.) With the fold facing up, knot the ends together behind your back.
Using this exact same technique, you can wear the scarf around your waist like a mini-sarong. This is a great cover-up look, or a funky accessory to layer over jeans or capris or even a skirt (a pencil skirt with this would be so cute!):
For the most daring fashionista, there's the bikini version:
Using the basic fold-over technique (picture below), wrap the scarf from behind and knot in front.
The next few techniques start with the scarf folded. I like to call it the "Hermes Basic Fold Over" or HBFO for short.
Start with the scarf lying flat.
Bring the opposite corners together in the center, like an envelope fold.
Fold the scarf again, with the sides again meeting at the center.
Fold over one last time at the center. Voila! The HBFO!
Once you've mastered this simple technique, you'll be comfortable tying your scarf in all sorts of ways. You can start with the basic neckerchief look. It's classic enough, just avoid pairing it with a poodle skirt.
Another chic option is to start with the HBFO, then wrap around your neck from behind, crossing the ends twice in front. Finally, bring the ends behind your neck and knot in place. Super chic!
This peach and blue vintage scarf is much smaller than an Hermes, but it shows the shape better than the lovely scrap of yellow plaid I've been using. A full-size Hermes scarf would still show this great shape, but with more volume:
Another option is the cravat-style:
1.) Start with the HBFO.
2.) Wrap around your neck with one side slightly longer than the other.
3.) Loop the longer side under the shorter, then around and under again and finally up through the top (like a necktie).
4.) Arrange the top side that you've just flipped through so that it lays nicely.
You can take this exact technique a step further and actually knot it like a traditional necktie:
In this instance, the "longer" side that you've looped around is passed through the wrapped fabric as opposed to over it. It's a little more secure than the cravat style and also a little more masculine-looking.
This next option is one of my favorites. It's very simple but it looks so cool and elegant:
1.) Start with the HBFO
2.) Wrap around your neck and tie in front with the ends hanging at equal length
3.) Grasp the edge of either end and knot together, pulling the second knot tight against the first.
The final style of this post is another simple but elegant technique. The final look is very chic:
You may think this technique starts with the HBFO, but you would be wrong! Start with the fabric lying flat. Fold over the opposite corners, but rather than letting them lie, knot them together and pull tightly. It starts like this:
As you pull tighter, it looks more like this:
Continue pulling the knot tighter, then wrap around your neck and knot in place. The ends you started with are the ends finish with. The rest of the scarf just wraps around and around itself creating that pretty wrapped and twisty look.
I hope you have enjoyed this post and learned a little something, too. If any of you have other special ways of wearing a scarf, please chime in! I'd love to hear about it!


2 comments:
Thank you! I've been dying to know how all of these people I see around get their scarves tied in such interesting ways! Now I know, and I can't wait to try some out!
Feel free to send pictures and I'll post them on the blog! :-)
Post a Comment