Wednesday, October 31, 2018

My Cutest Knitting Project

It's been pretty chilly around here lately. Fall has most definitely ARRIVED. The Farmer's Almanac says that this winter is going to be brutally cold. Taking Percy for his morning walks is not something I look forward to, TBH. Knowing that the snow will be arriving before we know it, Sam and I have talked about preparing our little Southern boy from Texas for his first winter in New Hampshire.

Sam is intent on buying him a set of those little booties, not just because of the cold, but because of the salt and sand, which we've heard is really bad for dogs. And since we walk Percy all over the place, not just our own yard or neighborhood, we want to protect his little paws.

Something else I did for the pup was to knit him a sweater. It was the first time I'd ever attempted knitting anything for a dog and it turned out GREAT! Just look at him!


I love how his face says it all. Like, "Ma. Come. On." He didn't struggle with me when I put it on him, but he also didn't seem too thrilled about wearing it. And when I took it off, he went nuts. But I think he'll appreciate it when the weather gets a little colder.

The pattern wasn't too difficult- I found it on Ravelry- it's called "Four Cable Dog Sweater." It was a very easy pattern. I like Ravelry because you can sort by price and type of pattern. I almost always find a pattern that's free. What's also great about that site is that the members post their finished products with ratings for the patterns, so you can see beforehand if it's an easy pattern or what colors it looks good in.

Because I have SO MUCH yarn stashed in my craft room (YES!!! I have a craft room in the new house!!!), I always try to find a pattern that will work with yarn I already have. I hate buying more yarn or fabric or notions- I'd so much rather use up what's left from previous projects.

But back to the pattern- like I said, it was pretty easy. You start at the bottom of the sweater and knit up, shaping as you go. Eventually, you join the yarn and knit in the round. The trickiest part for me was picking up the stitches along the bottom opening. But it was only tricky because I hate picking up stitches.

I'm a sloppy, lazy knitter, who almost always gets really lucky. In the case of this sweater, I didn't measure Percy and I didn't check my gauge. In fact, I NEVER check my gauge. Good knitters are clucking their tongues and wagging their fingers at me right now, but it's true. I have average tension, so most patterns just work out right for me. If anything, my tension can be a little loose, so if I use a smaller-than recommended needle or yarn, things often work out because of that.

If you don't knit, you're probably lost right now, so let me explain. When you knit something, the weight of the yarn and the size of the needles both have an effect on the end product. Each knitter also has their own unique tension- this is how tight you pull the yarn when knitting. This also has an effect on the end product- if you have really tight tension, the item will be smaller, and if your tension is loose, it will be bigger. So, every pattern will tell you the size yarn and needles you should use. as well as the correct "gauge" or how many stitches should equal a certain number of inches knit. You are supposed to "check your gauge" by knitting a small square to start. If the square is the right size with the yarn and needle recommended in the pattern, you're all good. If the square is too big or small, your tension is effecting the outcome, so you need to make an adjustment to your needle or yarn size. I didn't know this when I first started knitting and I made a pair of mittens that looked like they would fit the Jolly Green Giant. My mistake had been using a yarn that was much thicker than the pattern recommended.

Just like anything, you learn from your mistakes and knitting is no exception. I've made plenty of mistakes and the best thing you can do when you discover you've messed up is to rip it out and try again. This doesn't always mean starting over completely- you can often rip out to the point where you made the mistake and then continue.

Anyway, enough about knitting- if you have knitting questions, you can leave a comment below and I'll be happy to answer to the best of my knowledge. Just keep in mind I'm as amateur as they come with regard to knitting skill.

I took some pictures of the sweater without Percy in it because I want to show off the detail- this pattern features four gorgeous cables in the pattern. I love cables. They're not only beautiful, but they make the pattern more interesting to knit. Take a look!

Just look at those beautiful cables! 

I can't even STAND the cuteness of those little leg openings. SO totes adorbs. 

So, for those of you who are super impressed with my cable knitting skills, I want to let you know that it is SO FREAKING EASY to cable knit. People think it's hard but it's so so so not difficult AT ALL. In fact, if you know how to knit, you can cable. Cabling is a simple technique of twisting the stitches to create the roped effect. You just need an even number of stitches. I recommend knitting a scarf with a cable down the middle to practice. Here's a great pattern for a cable knit scarf:

Using size 10 needles and a chunky or bulky weight yarn, cast on 44 stitches. 

Row 1: K1, P1, K1, P1, P3, K3, P3, K8, P2, K8 P3, K3, P3, K1, P1, K1, P1
Row 2: P1, K1, P1, K1, K3, P3, K3, P8, K2, P8, K3, P3, K3, P1, K1, P1, K1
Rows 3 & 5: repeat row 1
Rows 4 & 6: repeat row 2
Row 7: Cable row! Ok, so for the cable row, you're just going to knit in the pattern as you have been until you get to the first set of 8 stitches in the middle. When you get to the first set of 8 stitches, you're going to take the first four of those stitches and slide them into your cable needle. Then, drop that cable needle to the back of your work. This is the part that seems so scary! But don't worry- those stitches are going to be FINE! OK, once you've moved the cable needle to the back of your work, you're going to knit the next four stitches. THEN, you pick up the cable needle and knit those four stitches next. You'll see that the 8 stitches are now twisted. Ok, take a deep breath, because you're halfway done the cabling party. P2. Now, you're at the second set of 8 stitches and you're going to do the exact same thing as before with ONE major distinction. Instead of dropping the first 4 stitches onto the cable needle and putting them to the back of your work, you're going to put them to the FRONT of your work. This way, the first cable will twist in one direction and the second cable will twist in the opposite direction. It will look cool. I promise. OK, now that you're done the cables, finish knitting the row in the established pattern. 
Row 8: repeat row 2

Ok, now all you have to do is continue knitting these same 8 rows over and over and over again until the scarf is as long as you want to make it! When you're done, bind off in the pattern. 

Happy knitting, everyone!

XOXO

Monday, October 29, 2018

Introducing: PERCY GRAINGER HABASHY!!!

Guys, I can't believe it took this long for me to blog about him, but have you seen our dog?!?!?!?


I mean, have you ever seen such a cutie? He is 100% the cutest dog on the planet. Sorry not sorry if you think your dog is the cutest, but you're probably wrong. I mean, your dog might be cute, but he/she is not PERCY cute. Just sayin'.

Sam and I knew that once we bought a house, we'd finally be able to adopt a dog. As soon as our offer on the house was accepted, I started looking on Pet Finder and local dog rescue sites right away. It is unbelievably difficult to adopt a dog! The application process is intense. They want pictures of your home, your yard, your fence! They may want to schedule a HOME VISIT! They want three references that aren't family. They want to know your entire animal-owning-history. WHY don't you have a dog now? If you had a dog before, WHY don't you have one now? Did you give him up? Did she die? Who is your vet? What's your work schedule? What will you feed him/her? How much exercise will you give them? Will you take them to doggie obedience school? If you have other pets, tell us their entire temperaments, how long you've had them and the likelihood they'll get along with a new dog.

It's intense. Like, they want more info than the mortgage company did when we were buying the house. Anyway,  we were open to a dog on the small side in a breed that suited our lifestyle. We didn't want a dog with so much energy that they'd be miserable at home while we were at work. We also didn't want a total couch potato. I did some research and after reading about all different breeds, I felt that a Border Terrier or Cairn Terrier would be the kind of dog we could give a great home to. A dog that's active and loyal and smart, but can also chill while you watch TV on the couch at night.

I applied for lots of dogs over the course of a couple of weeks and we were continually rejected. Like, we didn't even get to the point in the process where they ask to see our home or ask follow-up questions to the application. Just flat-out rejected right off the bat. It was starting to get frustrating because it also wasn't clear WHY we were being denied the opportunity to adopt a dog. Was there something about us that the rescues felt was off? Did we not appear to have the potential to be good dog parents?

Finally, one day I saw a post on Pet Finder for a Border/Cairn Terrier mix named Percy. His story was unique- He was living in Texas where he'd been born, but needed to be adopted to a family up north. Texas needed to be in the rear-view mirror for him. He was about 2 years old, already house trained and he seemed to have a great personality. I wrote the application of my life. I probably spent over an hour trying to answer every question perfectly. When I hit the "submit" button, I was on edge, desperately wanting this dog, but feeling really down-trodden over the myriad of rejections we'd received.

Within a few hours, I had a reply from the rescue, asking if they could call me and with some follow-up questions! After a successful chat on the phone, they offered to let me Facetime with Percy, which I was more than thrilled to do. I spent about an hour on the phone/Facetime with the rescue being pretty intensely interviewed. I was asked to provide references and told they'd be in touch with their decision. I barely slept that night. I'd already fallen in love.

The next day, the rescue called to say that they decided to let us have Percy! I cried I was so happy! The next step was to sign the contract (almost as intense as the application), and to work out the details of getting him from Texas to New Hampshire. In the end, the rescue decided to send him up on the "Rescue Road Trips" truck. This organization drives all over the place, picking up pups and driving them to their fur-ever homes, or at least close by. We had to drive about 2 1/2 hours to Lisbon CT nearly a month later to pick up our boy. It was SO worth it.


We woke up super early on Saturday September 8th and hopped in the car to drive down to Connecticut. There were probably a dozen other families there as well, waiting to pick up their own pups. When the truck pulled into the parking lot, I could barely contain my excitement. Percy was the second dog off the truck:


It took Percy a few weeks to really settle in and start to feel comfortable, but he's definitely part of the family now. I just love him so much. 


He's snuggled next to me right now as I type out this blog post. I'm so happy the rescue decided to take a chance and give Percy to us. I understand now why we were rejected so many time before- because those dogs weren't OUR dog. So, if you're trying to adopt a dog and you're getting rejected and feeling frustrated, don't stress. Just know that those dogs aren't working out for you because they aren't your dog. YOUR dog is still out there, waiting. Maybe he's just not ready to be adopted yet. Just be patient and you'll be rewarded. I mean, just look at us!

XOXO

Saturday, October 27, 2018

Finishing the Living Room OR The World's Easiest DIY Project

A while ago, I blogged about putting together the decor for the living room, using my bright turquoise blue piano as the focal point. I decided to do this by incorporating all different shades of blue and teal along with neutrals like grey and champagne and little pops of other accent colors like yellow and green.

While planning the room decor, I shopped a lot on Facebook Marketplace and Craig's List. I love finding super cheap furniture and making it over. I saw a set of cane chairs that were so cool, but at the time I was leaning towards a soft color palette (this was prior to Sam admitting he loves the bold color of my piano), and I thought the style of the chairs was perfect, but the colors were a little too bold. I kept looking. I also emailed a friend who is a master of second-hand and thrift-store/estate sale/antique store shopping and asked her to keep an eye out for that style of chairs. A week or so later she found a gorgeous pair of similar cane-back chairs at an estate sale. The pair was selling for just $60. Seemed like a bargain, so I told her to buy them. The were pretty dirty, but otherwise still in great shape, and I figured I'd probably paint and reupholster them anyway.


How cute are they? I figured that if they cleaned up ok, I would leave them in the neutral palette, but if not, I could have them painted and reupholstered. Well, after buying them, that was when Sam dropped the BOMB on me that he wanted me to leave our piano bright blue. It reminded me of the original cane chairs I'd seen a month or so earlier. I decided to see if they were still available because if I left the piano bright blue, the chairs I'd seen online would have actually been PERFECT. 

As luck would have it, the chairs were still available and the seller was even willing to drop the price on them. I picked them up the very next day for just $220 for the pair. Yes, a lot more than the $60 estate sale chairs, but their color and print worked so much better with the piano and the other elements in the living room. Also, re-upholsering these chairs myself would be a lot harder than the dining room Parsons chairs, so I'd looked into have a professional do it. I got a quote of about $250 per chair. At $220 for the set, I was already ahead. 

So, when I titled this post "The World's Easiest DIY Project," you can see why! All I had to do was pick them up! And they're so fabulous!


Once I had the chairs, the living room really started to come together. I finished the room off with a few potted plants and now I'm doing my best not to kill them. I have been known to have a black thumb. Wish me luck! 

Meanwhile, the estate sale chairs cleaned up pretty well, so they're hanging out in the corners of my dining room. Not sure if I'll keep them or re-sell them or what. Time will tell, I suppose. 

Anyway, thanks for reading! It's so fun sharing my journey and I hope you enjoy it, too! 

XOXO

Thursday, October 25, 2018

Updated Vanity- A "Sorry Girls" Inspired DIY

Right around the time we were buying our house, I stumbled upon the cutest YouTube channel called "The Sorry Girls." Basically, it's two totes adorbs young Canadian women (get it? "Sorry" girls? Cuz they're Canadian? haha) who do all sorts of DIY and up-cycling projects. They do fashion, home decor, "the look for less," and they do it with personality. What I like most about them is that they make DIY accessible for literally anyone. Even me.

So, when we moved into the new house and I started creating my new daily routines within the new spaces, I found myself excited to use my vanity again. In the apartment, due to the small amount of space we had, it gradually became a catch-all for junk. I rarely used it to put on my make-up anymore. But the sunlight in the morning in our new bedroom was so glorious that I knew I needed to get back into using it, for the amazing lighting alone. Fortunately, there was a great little space for it, and it looks great in the room. For those of you unfamiliar, here's a photo of the vanity in the old apartment:


So cute! I bought it at Brimfield one year for about $70, I think. I love how dainty it is, but the dainty quality also means there isn't a lot of storage. Once I put all my makeup on/in it, plus a box of tissues and all my various accoutrements, it becomes cluttered and a lot less functional. So, I started thinking about how I could combat that issue while keeping it dainty and cute. Cue: Sorry Girls Inspo. The YouTube channel often features clever storage ideas and although I didn't copy any of their ideas exactly, I did take inspiration from them in one particular way: I tried to think creatively about the types of pieces that could become cute storage. 

I started at Walmart and the Dollar Store, because as you know, I'm a total cheapskate. I wanted to keep this project as inexpensive as possible. My goal was to add storage to the side of the vanity for both the things that don't really fit in the drawer (like a box of tissues and my perfume bottles) and the things that I use on the daily, for quick and easy access. I figured little side baskets or buckets would be ideal. I wandered around what felt like every single aisle at Walmart and the Dollar Store before finding the final pieces. 

I ended up buying: 
3 small metal buckets from the "Back to School" aisle
1 wooden dowel from the craft aisle
1 gold chain from the jewelry section of the craft aisle
1 wooden silverware tray from the kitchen organization aisle
2 gold curtain rod hooks from the curtain aisle
1 gold decorative placemat from the kitchen/home decor aisle

I also had a can of gold matte spray paint and a bunch of C-hooks already at home as well as some screws and super glue. 

I started by cutting the wooden dowel down to a length that was the same as the depth of the side of the vanity. I sanded down the cut edge and then spray painted the dowel. The metal buckets were bright yellow, so I spray painted the inside and outside of those next. I also painted the wooden tray and the C-hooks. The chain and curtain rod hooks were both already gold, so that worked out. 

Once the paint had dried, I set about installing the storage pieces. On one side of the vanity I screwed the curtain rod hooks and added the dowel with the buckets hanging on it. On the other side, I screwed in two C-hooks. Then I attached the chain to the silverware tray using super glue and some picture-hanging triangle pieces that I already had. I cut the placemat down to fit inside the tray. I did this for two reasons: 
1.) It looks really pretty
2.) It helped add a grippy, non-slip texture to the tray

Once the tray was all assembled, I just had to hang it from the C-hooks with the chains I'd attached. I've been using the vanity pretty much every single day since then and I love it. Everything is so accessible, but still looks glam and cute!

Don't you just LOVE the added texture the placemat gives the tray? I love it! 

These buckets were bright sunshine yellow, but the matte gold paint gave them a touch more sophistication. And they're the perfect size for holding my make-up brushes, tweezers, etc. 


The golds don't all match, but I don't really care all that much because there are enough elements that are different that it all seems to work. I've since moved the tissue box over to the wooden tray and put a clear tray in its place to hold my lipsticks. They are more organized this way. It's so nice to have everything so accessible! 

The last step in putting together the vanity was replacing the chair. The wooden one in the picture above never worked, so I created a slip cover for it when it was in the old apartment. But the new space for the vanity is a little smaller, so I wanted a stool that could easily tuck under the vanity when not in use. For that, I did the world's easiest DIY, one that I saw on Pinterest time and time again. It's actually a super basic IKEA hack using a $7 stool. Yup. Seven bucks. 


You can see the original in the upper right corner. It's a white metal base with a white plastic top. Sturdy and very inexpensive, but not exactly cute. I'd seen TONS of make-overs on Pinterest of this stool, so you can easily look them up, but here's the basic concept: 

Step 1: Spray paint the legs. 
Step 2: Cut out a piece of foam the size of the seat. 
Step 3: Using fabric glue, attach the foam to the seat. 
Step 4: Cover with fabric of your choice, using the fabric spray adhesive to  attach to the underside of the seat.**
Step 5: Screw the legs into the seat per the IKEA instructions. 

I made Step 4 slightly more complicated. Many of the versions you'll see of this upcycle involve really textured fabrics like faux fur. So, wrinkles in the fabric, or bunching aren't really problematic since the texture of the fabric hides most of that. But I wanted a velvet seat, which looks better when it's neater. So, for my version of Step 4, I cut out a circle of velvet about a 1/2 inch bigger than the foam. I then cut a strip of velvet about an inch wider than the side of the foam, and long enough to wrap around the entire circle of velvet. I then sewed the strip to the circle, essentially making a custom cover for the seat. It just looks a little neater overall. If you don't mind some pleats or wrinkles in your fabric, you don't have to take this extra step. 

One thing I didn't do, but I might add in the future is some tufted buttons. You can see that the original stool has a bunch of holes in the plastic seat. So theoretically, you could use an upholstery needle to sew tufts into the cushion and add decorative buttons right through those holes. It could be really cute. When I bought the one stool, I figured, "I'm paying a shipping fee for one, so I may as well order a bunch." So, I have three more stools that I'm thinking of doing a similar make-over on for additional seating when we have people over. Since the stools are stackable, I could keep them in a corner and just pull them out as needed for parties and such. I'm thinking of keeping the gold legs, but using different fabrics and textures for the cushions. Let me know what you think- I'd probably keep them in the living room most of the time but they would also work for additional seating around the dining table. Leave a comment if you have an idea for what I could do. I have plenty of velvet to make all of them the same as the vanity or I could shop around for other fabrics, too. I'm undecided. Tell me what to do in the comments! 

Thanks for reading!
XOXO


Tuesday, October 23, 2018

Crazy Flower Project

I mentioned in a previous blog post that in decorating our new house, I had decided to embrace the fact that Sam and I love bold color and pattern. Our bedroom was already pretty bright with bold blue, yellow, white and teal bed spread and pillows. But then I saw a project on Pinterest that intrigued me. It was such an inexpensive idea that I thought, "Well, if I do it and Sam or I hate it, it won't have been a lot of money wasted."

The idea was to create enormous paper dahlias to hang on the wall above our bed. Here's how it turned out:

WHY ARE THESE PHOTOS SO BLURRY?!?!?

I bought colorful card stock paper at the craft store and did my best. The concept is really simple. You start with a cardboard circle- the bigger the circle, the bigger the flower. I did two 8-inch circles, and three 6- inch circles. The next step is to cut squares of colored paper. You need a LOT of squares. For each flower, I probably used about 60 or so squares. In the beginning (big blue dahlia), I used the same size squares for the entire flower. But as the project went on and I got a little better at making the flowers, I ended up varying the size of the squares. With the pink one, I started with six inch squares on the outside, then used 5 inch squares for most of the flower and 3 and 4 inch squares for the very center. It's definitely the best-looking flower, so if you do this yourself, take my advice and use a range of sizes on the squares.

Anyway, I'm sure you could figure this out on your own, but once you have the squares cut, you just glue them into a cone shape and then glue the cone to the cardboard circle. Start on the outside and work your way in. I used Elmer's glue on the first flower and it took FOREVER. The rest of the flowers I used hot glue and it went a LOT faster. I probably used an entire package of glue sticks from start to finish. If you want a more detailed description of how to do this, there are plenty of tutorials on Pinterest. Just search for "Giant Paper Dahlia DIY" and you'll see a bunch. People have done it with vintage music paper or paper torn out of old books, or newsprint. I liked the idea of a colorful display, and I liked the idea of card stock because I thought it would hold up nicely. The leaves I added were just leaves from the craft store. I'm not in love with them. I wish I'd chosen ones that were a little fuller, more lush, but I don't hate them enough to start over. I used Command strips to hang these up. Each flower took about an hour of cutting, rolling and glueing, done mostly while watching TV or listening to a podcast. And as for the ombre color of each flower, that happened mostly because the card stock is sold in packages that have a bunch of shades of the same color- I bought a package of blue/teal, a package of pink and a package of yellow.

I don't know what my next project will be, but I'm leaning towards doing a bathroom make-over. Not a huge remodel, but I think a coat of paint and some cute accessories could go a long way to make our bathrooms a whole lot cuter.

I'll keep you posted!

XOXO

Sunday, October 21, 2018

The Rest of the Dining Room

Hey hey- welcome back! I hope you've been enjoying these posts I've been writing about decorating our new house.

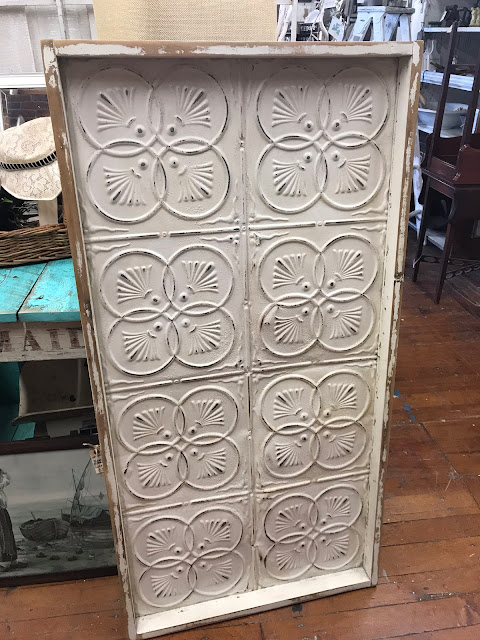
Last time I wrote about the big project of reupholstering a set of four Parsons dining chairs. What I didn't tell you was the beginning of the story and the dining table idea that necessitated a new set of dining chairs to begin with! You see, when Sam and I upgraded from our little 2-bedroom apartment to a new ranch style single-family home, we ended up with an actual formal dining room. In our old kitchen, I had a cute pedestal table with simple wooden chairs, and that would have worked fine for the new space, but on a random trip to the Canal Street Antiques Market, I found a piece that would start the ball rolling on creating an entirely new dining set:

P.S. If you've never been to the Canal Street Antiques Market, it's basically a mini-Brimfield. 

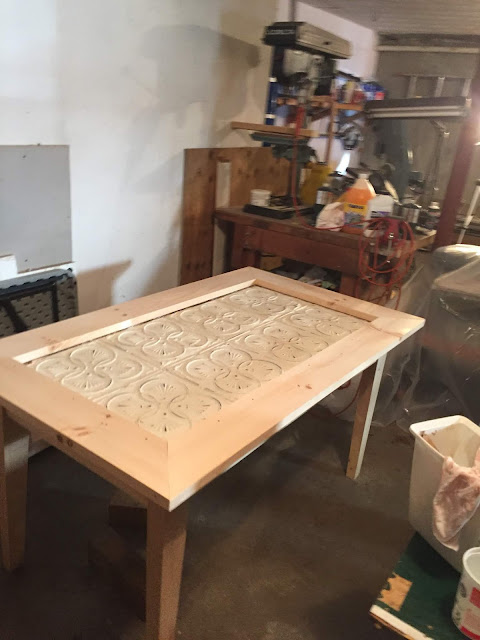
The minute I saw this decorative wall hanging made with vintage tin ceiling tiles, I knew exactly what I would do with it. I brought it right to my parents house and asked my oh-so-talented stepfather Mike if he could build a table with it. He's great at woodworking and was kind enough to take my vague description of what I wanted and build an incredibly beautiful table for me. 

I had pictured the table with a glass top and the tin ceiling tiles set into a frame.  I wanted to paint the frame in a pale, buttery yellow with a slightly darker yellow color for the ceiling tiles. The inspiration for the color scheme was actually an enormous hutch that my mom painted for her own dining room: 


I don't know where SHE came up with that color idea, but I was intent on stealing it for my table. After passing along the general design idea and the tin ceiling tiles to Mike, the next step for me was to find the glass top. Since these are crazy expensive, I started looking on the Facebook marketplace and Craig's List. I finally found one that seemed to be the right size. The seller had listed the entire table and chairs for $60:


When I first messaged the seller, she told me that she had an interested buyer already. Bummer, right? Well, fortunately I didn't take "no" for an answer and got creative with my offer. I basically said to her, "Well, if you'd like to double your money, I'd be interested in purchasing the glass top on its own. If your other buyer is ok with purchasing the set minus the glass top, I'll happily pay what you're asking but for just the glass." I could hardly believe it when she agreed! And she even offered to deliver it to my parents house the next day! Amazing! 

Now that all the pieces were in place, I just had to wait for Mike to work his woodworking magic. After just a couple of weeks, I was astonished at how beautiful a table he'd made: 


My mom offered to prime it before they dropped it off: 


Once it was delivered, it only took two coats to be completely finished!


It was SO HARD for me to wait for the paint to dry before moving it into the dining room. I hate waiting. I'm just not the most patient person. Sam and I went apple picking while we waited for the paint to dry and later that day were able to bring it in from the garage. The glass top fit perfectly on top and finally after nearly 2 months from when I had the original idea, my dining room came together: 


I think the key with some DIY projects is knowing your limits.  Before buying the tin ceiling tiles, I texted a picture to my parents and asked if they thought my idea was feasible, and more specifically if Mike had the time and was willing to help me with it. I knew my vision was not only out of the realm of my skillset, but I also don't own the tools necessary to do it right. 

So, to break down the price of the table on my end (my stepfather gifted me the labor and the wood): The decorative tin ceiling piece was $75, the two containers of paint and a couple of painting supplies came to $25 and the glass was $80- I paid the seller an additional $20 for delivery. Add in the cost of the chairs- around $30- and I'm all-in on the dining set for about $200! Now maybe $200 sounds like a lot for a DIY project, but when you consider the end result and how incredibly unique it is, it's a true bargain. I love that my table is truly one-of-a-kind and I love even more that the whole look was a collaboration with my stepfather. He is incredible with this kind of project and I'm so fortunate that he was willing and able to help me. 

So let me know what you think! I'm pretty psyched (obvi) but it's always nice to hear what other people think! 

Friday, October 19, 2018

Re-Upholstered Parsons Chairs

What is it about Parsons chairs that I love so much? I don't really know- often they look a little too formal and stuffy, but when the fabric is just right, they can be SO cute! I love them as a set for a dining room and I also love them for an accent chair in a bedroom or dressing room. Home Goods and Marshalls have really cute ones all the time, but they cost upwards of $75-$150 each.

Although that price is reasonable for that type of chair, if you know me, you know I'm a total cheap skate and I would never spend that much unless they were absolutely the perfect color and style. Shopping online and in stores, I kept finding ones that were fine, but just not quite right. And if it's not quite right, I'm certainly not willing to pay that much. I started looking around for a second hand pair that I could re-upholster myself. I found a few sets that were ok, but still kind of high- around $50 per chair.

After looking around myself for a couple of weeks and coming up empty handed, I reached out to my mom and my friend Amy. Those two are second-hand shopping QUEENS. I let them know a few things I was looking for, and among the list was a set of 4 Parsons chairs. I couldn't believe it when literally the VERY NEXT DAY Amy messaged me to say that she was at her local Goodwill and had found 4 matching Parsons chairs for just $1 each. She sent me a picture:

$1 EACH?!??! I of course told her to buy them! She messaged me a minute later- turns out Goodwill had a special discount that day- all furniture was an additional 50% off. So I got my chairs for just $2! When she got them home, she sent me a few more pictures. They were a hideous brown and in terrible shape from the previous owner's cat treating them like scratching post, but I couldn't have cared less!


Off I went to the fabric store where I found a soft yellow print that was PERFECT. It was a buttery-yellow background with French script-style writing in a charcoal grey. LOVE. I'll explain in a future post how I came up with the color idea. It has to do with the dining table that will eventually go with these chairs, but that table deserves a post all its own. 


It took me a few weeks to find the time to actually work on this project, and about 11-12 hours total time to complete it. This was a far cry from the 15-minute make-over I gave my living room end tables. And if you don't have at least a basic understanding of sewing, I would recommend leaving it to the professionals. I had read a few tutorials online for how to reupholster this type of chair, but I was a bit nervous at the start, regardless. 

I began by taking one chair apart. Mine came apart into 4 pieces- the back of the chair with the two back legs attached, the seat, and the two front legs. Using a seam ripper, I carefully removed the original upholstery. The deconstruction process is actually the hardest part of reupholstery projects. 

If you attempt this type of project yourself, you'll find that the fabric is stapled onto the furniture, so you need to pull the staples out in order to remove the fabric. You can just cut it off, but since I wanted to use the original fabric as a pattern, I wanted to keep it as intact as possible. So, using a flat-head screwdriver and a pair of pliers, I painstakingly removed EVERY SINGLE STAPLE. 

SO MANY STAPLES!!!

It's really hard work- it's time consuming and it takes a little muscle. The method you use is to try to wedge the flat-head screw driver under the staple and wiggle it until the staple starts to come out. Then you take the pliers and after getting a good grip on the staple, you rock the pliers back and forth until the entire staple pops out. Sometimes the staple breaks. That's a bummer. Your hands will hurt. Your body will ache for hours after you're done. It is NOT easy or quick. 

Once you're able to remove the fabric, you can use the pieces as a pattern. Just to be safe, I made a mock-up cover using some scrap fabric I had lying around. The key is not only cutting the pattern out exactly, but also sewing the EXACT same seam allowance. That's probably the trickiest thing, but if you can do it, the fabric will be so smooth and taut and look so much more professional. After making the mock-up cover, I felt confident enough to cut into the real fabric. The pattern pieces were simple enough- the back of the chair was made up of a front, 2 back pieces and two side pieces. The seat was made of two sides and a topper. Easy enough to cut out and stitch together. 

I was able to machine sew almost the entire thing, with the exception of the back of the chair where the two back pieces came together. I hand-stitched that seam after putting the cover onto the chair. Once the fabric pieces were sewn together and put onto the chair pieces, I simply stapled the fabric exactly the same way it had been stapled originally. If you've ever upholstered anything you know how to do this- it's really simple. Start in the center, pulling the fabric really tight and work your way to the edge. It helps to pay attention to how your original chair was put together and just replicate it when you re-do it. After stapling the fabric onto the back and seat, it was a simple matter of putting the chair back together and voila! Done! 

I didn't take pictures documenting the process because there are plenty of great tutorials online for how to do this, so why bother when it's already out there for you. PLUS, every set of chairs is different, so meticulously documenting the intricacies of MY set is silly. Anyway, once I had one chair done and dusted, the other three finished relatively quickly by comparison. The first chair had to be meticulously deconstructed, being careful to keep the fabric intact. I also made the mock-up cover and then very slowly and carefully made the real cover. In total, I spent about 6 hours on the first chair alone. But the remaining three probably only took me about 4-6 hours total, which I spread out over several days. And the end result is awesome!


I recommend attempting a reupholstery project if you have the time and patience to do it right. Paying a professional to do what I did would have cost around $100 per chair, so it was most definitely worth the effort, in my opinion. 

Next time I'll tell you all about the table that these chairs go with- it's even better than the chairs, if you can believe it! 

Have an awesome day and thanks for reading!

XOXO

Wednesday, October 17, 2018

DIY- Upcycled End Tables

When starting my DIY projects for the new house, I tackled one of the toughest ones early on- reupholstering some Parsons dining chairs. I'll go over how I did that in a future post, but I bring it up today because I think Sam had his doubts about me and my approach to decorating the house because of those chairs.

When our offer on the house was accepted, I immediately starting working on decor ideas and in the process ended up buying some pretty ratty-looking furniture with the intent of making it over. At one point in the move-in process, Sam looked at the furniture I'd brought in and said, "Why do you keep bringing trash into our new house?" What Sam didn't know about me yet is that I LOVE the challenge of turning trash into treasure and I love doing it on a dime. And as much as I might try to explain that to him, what he really needed to understand was to SEE.

That's why I bring up the Parsons chairs. They cost $2 for all four of them. I spent another $30ish on fabric. Then I spent about 10 hours meticulously re-upholstering them. When they were done and I showed them to Sam, he started to understand and I think I may have even impressed him a little.

So, upon seeing my finished Parsons chairs, he actually agreed to buy me a pair of absolutely stunning gold end tables. At about $150 each, he thought they were crazy expensive. BUT I LOVED THEM and after seeing the Parsons chairs, I think he felt I deserved a treat. But before he whipped out the credit card, I said, "Before we buy these expensive end tables, I want to visit Deja Vu, a hit-or-miss second hand furniture store down in Derry." He seemed confused, but I explained that as much as I loved the expensive tables, I wanted to shop around and just see if I could find something fabulous for a little less.

So, the next day I made the drive down to Derry and visited Deja Vu. This store is massive and you never know what you're going to find, but usually there'll be at least SOMETHING interesting to take home.

Anyway, because Deja Vu will often empty out an entire building, they have a LOT of duplicates. For example, when a hotel decides to redecorate, Deja Vu will clear out all the old furniture and re-sell it. So, if you see an end table or a headboard or a set of lamps, you could ask if they have more and the answer will likely be, "Dozens!" Because of their surplus, they've started putting a selection of items outside under a tent and referring to it as the "Free Tent." If it's under the tent, it's free. You can leave a donation for a local charity, and they're just happy to have gotten rid of some inventory.

So, the day I went to Deja Vu, I saw two matching end tables under the free tent. They weren't pretty. Boring wood color, square-ish, but sturdy and in pretty good condition. I left them there and wandered around the rest of the store for about an hour. When I didn't find anything I liked, I went back outside and the tables were still there under the free tent. I thought, "Eh, what the hell?" and loaded them into the Mini Cooper. They barely fit. On the way home I bought a can of gold spray paint and a roll of faux marble contact paper.


About ten minutes worth of spray painting and the tables were already 1,000 times better, but I'd recently seen a YouTube tutorial on using faux marble contact paper to refinish a table top and I wanted to give it a whirl. Since the tables were free, if it came out terrible, I wouldn't even feel bad about tossing them on the curb. The roll of contact paper that I'd bought at Walmart was the right look, and definitely the right price at just $6. However, the tables were about 2 inches too wide. The contact paper wouldn't even cover the top, much less the beveled sides of the top piece.

So, I went to amazon.com and found a slightly wider contact paper. It was a lot more expensive- $18- but still a bargain if I could make it work.

With Sam's help, each table took about 10 minutes to cover with the paper. I lined the edge up carefully and then he slowly peeled the back off. Using the edge of a credit card, I made sure the paper went down smoothly without wrinkles. I trimmed the edges with an Exacto knife. The key was to go slowly, trying to make it as smooth as possible. It's almost impossible to avoid the occasional bubble in the paper, but there's an easy fix. Just take a sharp pin or the end of a needle and poke a hole in the bubble. Smooth it down with the edge of the credit card. You can't even see the hole when you're done.

In the end, these tables turned out fantastic and I seriously couldn't beat the price! Even after buying the spray paint and contact paper, they cost less than $30 for the pair!


Similar tables sell for about $100 each, so I can't help but be happy with these! If you want to attempt a similar project, I recommend finding tables with a very simple, clean edge. If it's curved, it will be very difficult to get the paper to be perfectly smooth. If you have small enough tables, you can find the contact paper at your local Walmart for about $6. If you have a bigger table, you can find the contact paper I used here.

Next time I'll tell you all about my Parsons chairs, especially since I teased you so much in the beginning about them! Have an awesome day and thanks for reading!

Monday, October 15, 2018

Super Soup!

The market near where I work always has about half a dozen soups available and they're usually pretty tasty. The other day I saw they had a new one- Spiced Pumpkin Bisque. I got a cup for myself with a mini baguette. I want to be clear- this was no Pumpkin Spice Soup, but Spiced Pumpkin Soup. It was nothing like the sickly sweet flavor of pretty much every single Pumpkin Spice product out there at this time of year. I had glanced at the ingredients while filling up my cup of soup so the next day I decided to try to recreate the soup at home.

It was most definitely a success. If you want to make it yourself, here's what you'll need:

32 ounces chicken broth (or vegetable broth if you want to make a vegetarian version) plus a little extra if needed
1 medium yellow onion, chopped
3 cloves garlic, minced
1 large sweet potato peeled and chopped into large chunks
1 15 oz. can pumpkin puree
1/2 cup heavy cream (optional)
Sage
Cumin
Cayenne pepper
Salt & Pepper
Fresh cilantro and shredded Parmesan for garnish

Start by sautéing the onion and garlic in a tablespoon of olive oil. Once they are translucent and fragrant, add the chicken broth and bring to a boil. Once boiling, add the sweet potato and reduce heat to medium, allowing to simmer until the sweet potato is fork tender- about 12 minutes. Next, add the pumpkin puree. Using an immersion blender, puree the soup until smooth. At this point, you may or may not want to add more broth depending on the thickness of the soup. I added a small can of broth in addition to the original 32 ounces. If you don't have enough broth, you could always add a little water.

Once the soup is smooth, you can start to season. I have to be honest- I didn't measure any of my spices. I just sort of eye-balled it and hoped for the best. I probably started with about a 1/2 tsp of sage, a tsp of cumin and a 1/2 tsp of cayenne. Plus a dash of salt and about a 1/2 tsp of black pepper. I'd recommend starting there and adjusting the seasoning to your own taste. I wanted a spicy soup, so I ended up adding about another 1/2 tsp of cumin, sage and cayenne. Again, this is an estimate as I did not measure, I just sprinkled the spices right into the soup. What can I say, I live on the edge!

At this point, you could be done- ladle it into a bowl, garnish with fresh cilantro and shredded Parmesan and enjoy it with a crusty baguette. OR, you could take it to another level and add a half cup of heavy cream. I found this soup to be delicious with or without the cream, but when I added the cream, it not only made it a little more rich (duh) but it added a depth to the overall flavor that really complimented the spices and pumpkin flavor.

What I like most about this soup is how easy it comes together and how simple and few ingredients you need to make a really delicious dish. It's hearty enough to stand on its own as a meal, but would be lovely accompanied by a fresh green salad, too.


Bon appetit, friends!

Saturday, October 13, 2018

DIY Advice: Start small

Moving into a new place, whether bought or rented can feel really overwhelming. I'm the kind of person who gets very excited, but I also get very overwhelmed. I want to snap my fingers and have the changes just done! Poof! Abracadabra! Patience really isn't my thing.

Since our new house is much bigger than our old apartment, I immediately started a Pinterest board and my brain wouldn't shut off for at least three weeks. I had grand plans of adding board & batten wainscoting, painting every wall, (except for the ones I wanted to knock down), installing new flooring, and buying all sorts of new furniture and decor. Except all of those things require lots of time and even more money, neither of which were in great supply at the time.

So, I decided to start small, and take it one room at a time. When even that felt like too much, I took it one piece of furniture at a time. I had a yard sale before moving to get rid of everything I knew we didn't need or want anymore. I got rid of a lot of clutter and junk and a couple of furniture pieces like a baker's rack, some side/accent tables, book shelves, that kind of thing. We kept almost all of our major furniture pieces and decided to start just by seeing how everything fit in the new space.

We were really fortunate that most of our old furniture worked perfectly in the new spaces, so I didn't have to make many huge changes. But in a new house, it's just nice to have some new things to make it all feel fresh. The living room was the first space I tackled and I decided to keep it simple with only minor decor pieces that were meant to pull the room together. I still haven't put any paint on the walls, but there's enough color in all the furniture that the beige walls and carpet aren't all that terrible.

Here's the room when we bought the house:

This room is easily twice the size of our old living room, which was really exciting at first. But then the thought of filling it appropriately seemed a bit daunting. I mentioned in my last post that I had to re-vamp the color scheme I'd planned upon hearing how much my husband loved the color of my piano:

 (Side note: When your professional piano movers flake out and no-show, you call your super strong, body-building, weight-lifting friends and they help you out!)


I'm so glad that Sam spoke up about his love for the boldly colored piano. I'd planned a soft, pastel, beachy color scheme of pale blush, mint, and champagnes for the entire house. When he spoke up about the piano, I had to re-think that. And I'm so glad it happened that way because here's the thing: Sam and I aren't soft, pastel, beachy color people. We both prefer bold colors in just about every situation. Sam and I both have closets bursting with colorful clothes and shoes and practically devoid of neutrals. Why on earth had I tried to change that? His remark about the piano helped me realize that instead I needed to embrace our love of color. I was concerned it wouldn't look adult-like, or sophisticated. I couldn't have been more wrong and I'm so happy with how it turned out in the end!

And the best part is that it meant one less painting project since the piano could stay the same bold, beautiful turquoise blue!

So, with boring beige walls, boring beige floors, and even a boring, beige sofa, I set about pulling the room together with all different shades of turquoise and teal, all inspired by and centered around that blue piano. I figured the key was in the texture and pattern mixture. I've never been afraid to mix pattern and print, and I'm really happy with how it all turned out from the curtains to the throw pillows, to the mix of old and new (to us) pieces. I say "new to us" because I rarely purchase anything brand new when it comes to furniture and decor. This is for two reasons:

1.) I'm super cheap.
2.) It's so much more FUN to take someone else's cast-offs and breathe new life into them to make them your own and to make them work in your space. Whether it's adding accessories, or an entirely new coat of paint or upholstery, there's a great sense of satisfaction and accomplishment that comes with this approach versus just pulling out the credit card at the nearby furniture store. Yes, it's hard work at times, but it's SO worth it!

Anyway... here's the nearly-finished living room- all it's missing is a little more art on the walls (waiting on some canvases of our wedding photos to come in) and possibly a new paint color. Maybe, maybe not. We'll see.


This room is absolutely FULL of re-purposed, up-cycled, second-hand, DIY'd, inexpensive but impactful things and I adore how it all turned out. Let's break it down:

The piano, coffee table, turquoise table, sofa and lamps all came from the old apartment. The faux marble/gold end tables, grey cane chairs, and most of the throw pillows, plants and accessories are new-ish.

The wall behind the sofa will be getting some beautiful artwork in the form of large-ish canvas prints from our wedding. Can't wait until they're up! I love love love our wedding photos.

Anyway, let's start with the first project I did in this room- the pillows. Like I said in the beginning, when a project feels big, just start small. Baby steps. I knew that in order to make bright turquoise feel sophisticated and grown-up, I needed to add some luxe around it. But at the same time, it's not exactly a fancy house, so it needed balance to the textures. I found myself saying, "What Would Tim Woodward Do?" Tim is a friend of mine from high school who has great taste and a flair for decorating and I'm always impressed with what he comes up with. Anyway, Tim would likely have told me to go to the Christmas Tree Store. So that's what I did. It's probably not the first place you would think of- most people might start at Home Goods or Target. But the thing is, The Christmas Tree Store has a surprisingly decent selection of kind of everything, including amazing throw pillows. For around $50, I walked away with SO many in a huge range of texture and color. Once I got home and put them all on the sofa, I realized it was good, but not quite finished. It needed one more color and one more texture.

That's what I pulled out a sweater that my mom had knit for me over 10 years ago. She was a pretty good knitter and attempted a really complex Irish knit pattern. The cardigan was beautiful, but the wool wasn't the softest so I found that after 10 years I'd almost never worn it. Yet its sentimental value was enough for me to keep it. After checking with my mom to make sure she was ok with it, I took a pair of scissors to the sweater and made myself a pair of throw pillows.

For anyone looking to take on a project like this, it's incredibly simple. I started with an old pair of throw pillows and removed their covers. I measured the insert and then cut the sweater to be slightly larger by about half an inch all around. Since the sweater wasn't big enough to make two pillows front AND back, I used an old fleece pullover for the backs.

If you're cutting up a knitted garment, it's a good idea to "stay stitch" the edges to avoid the "fabric" fraying and falling apart as you put it together. Stay stitching just means running a stabilizing stitch along the edge. Super easy. After that, you just put the right-sides of the fabric together and using your sewing machine (or hand stitching if you don't have one), you sew up three sides and most of the 4th side. On the 4th side, you just want to leave an opening big enough to stuff in the insert- about 5 or 6 inches at most.

Once you've sewn the edges, the new cover will be inside out. Flip it right-side out and be careful to push the corners out from the inside. Then you can put the insert back in and using a needle and matching thread, hand stitch the opening you left. Boom. Done! Soooooo easy! I love how these turned out- they add a soft, cozy touch to the room and the texture is fantastic, too.


You can do this type of project in just about any size using just about any garment you have. I love the idea of using your grandfather's old flannel shirt or the baby blanket your kid no longer uses. Making a small throw pillow out of a something sentimental allows you to actually USE that item so much longer. And if you're the kind of person who likes to purge clutter but also likes a little nostalgia in their life, this is a great way to mix those two tendencies together.

So, what do you think of my living room? Next time I'll tell you all about the end tables and how crazy EASY and QUICK it was to glam them up. Thanks for reading! Leave a comment letting me know if you think I should paint the walls and if so WHAT COLOR?!?!?!
Related Posts with Thumbnails