Sam is intent on buying him a set of those little booties, not just because of the cold, but because of the salt and sand, which we've heard is really bad for dogs. And since we walk Percy all over the place, not just our own yard or neighborhood, we want to protect his little paws.
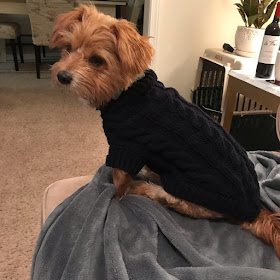
Something else I did for the pup was to knit him a sweater. It was the first time I'd ever attempted knitting anything for a dog and it turned out GREAT! Just look at him!
I love how his face says it all. Like, "Ma. Come. On." He didn't struggle with me when I put it on him, but he also didn't seem too thrilled about wearing it. And when I took it off, he went nuts. But I think he'll appreciate it when the weather gets a little colder.
The pattern wasn't too difficult- I found it on Ravelry- it's called "Four Cable Dog Sweater." It was a very easy pattern. I like Ravelry because you can sort by price and type of pattern. I almost always find a pattern that's free. What's also great about that site is that the members post their finished products with ratings for the patterns, so you can see beforehand if it's an easy pattern or what colors it looks good in.
Because I have SO MUCH yarn stashed in my craft room (YES!!! I have a craft room in the new house!!!), I always try to find a pattern that will work with yarn I already have. I hate buying more yarn or fabric or notions- I'd so much rather use up what's left from previous projects.
But back to the pattern- like I said, it was pretty easy. You start at the bottom of the sweater and knit up, shaping as you go. Eventually, you join the yarn and knit in the round. The trickiest part for me was picking up the stitches along the bottom opening. But it was only tricky because I hate picking up stitches.
I'm a sloppy, lazy knitter, who almost always gets really lucky. In the case of this sweater, I didn't measure Percy and I didn't check my gauge. In fact, I NEVER check my gauge. Good knitters are clucking their tongues and wagging their fingers at me right now, but it's true. I have average tension, so most patterns just work out right for me. If anything, my tension can be a little loose, so if I use a smaller-than recommended needle or yarn, things often work out because of that.
If you don't knit, you're probably lost right now, so let me explain. When you knit something, the weight of the yarn and the size of the needles both have an effect on the end product. Each knitter also has their own unique tension- this is how tight you pull the yarn when knitting. This also has an effect on the end product- if you have really tight tension, the item will be smaller, and if your tension is loose, it will be bigger. So, every pattern will tell you the size yarn and needles you should use. as well as the correct "gauge" or how many stitches should equal a certain number of inches knit. You are supposed to "check your gauge" by knitting a small square to start. If the square is the right size with the yarn and needle recommended in the pattern, you're all good. If the square is too big or small, your tension is effecting the outcome, so you need to make an adjustment to your needle or yarn size. I didn't know this when I first started knitting and I made a pair of mittens that looked like they would fit the Jolly Green Giant. My mistake had been using a yarn that was much thicker than the pattern recommended.
Just like anything, you learn from your mistakes and knitting is no exception. I've made plenty of mistakes and the best thing you can do when you discover you've messed up is to rip it out and try again. This doesn't always mean starting over completely- you can often rip out to the point where you made the mistake and then continue.
Anyway, enough about knitting- if you have knitting questions, you can leave a comment below and I'll be happy to answer to the best of my knowledge. Just keep in mind I'm as amateur as they come with regard to knitting skill.
I took some pictures of the sweater without Percy in it because I want to show off the detail- this pattern features four gorgeous cables in the pattern. I love cables. They're not only beautiful, but they make the pattern more interesting to knit. Take a look!
Just look at those beautiful cables!
I can't even STAND the cuteness of those little leg openings. SO totes adorbs.
So, for those of you who are super impressed with my cable knitting skills, I want to let you know that it is SO FREAKING EASY to cable knit. People think it's hard but it's so so so not difficult AT ALL. In fact, if you know how to knit, you can cable. Cabling is a simple technique of twisting the stitches to create the roped effect. You just need an even number of stitches. I recommend knitting a scarf with a cable down the middle to practice. Here's a great pattern for a cable knit scarf:
Using size 10 needles and a chunky or bulky weight yarn, cast on 44 stitches.
Row 1: K1, P1, K1, P1, P3, K3, P3, K8, P2, K8 P3, K3, P3, K1, P1, K1, P1
Row 2: P1, K1, P1, K1, K3, P3, K3, P8, K2, P8, K3, P3, K3, P1, K1, P1, K1
Rows 3 & 5: repeat row 1
Rows 4 & 6: repeat row 2
Row 7: Cable row! Ok, so for the cable row, you're just going to knit in the pattern as you have been until you get to the first set of 8 stitches in the middle. When you get to the first set of 8 stitches, you're going to take the first four of those stitches and slide them into your cable needle. Then, drop that cable needle to the back of your work. This is the part that seems so scary! But don't worry- those stitches are going to be FINE! OK, once you've moved the cable needle to the back of your work, you're going to knit the next four stitches. THEN, you pick up the cable needle and knit those four stitches next. You'll see that the 8 stitches are now twisted. Ok, take a deep breath, because you're halfway done the cabling party. P2. Now, you're at the second set of 8 stitches and you're going to do the exact same thing as before with ONE major distinction. Instead of dropping the first 4 stitches onto the cable needle and putting them to the back of your work, you're going to put them to the FRONT of your work. This way, the first cable will twist in one direction and the second cable will twist in the opposite direction. It will look cool. I promise. OK, now that you're done the cables, finish knitting the row in the established pattern.
Row 8: repeat row 2
Ok, now all you have to do is continue knitting these same 8 rows over and over and over again until the scarf is as long as you want to make it! When you're done, bind off in the pattern.
Happy knitting, everyone!
XOXO


